A few weeks ago I had written a blog about the new features in Web API 2.0 and how we can utilize these features to build a more robust, mantainable, lightweight API. In the same blog post I had mentioned that my favourite added feature to the Web API 2.0 was the OData protocol support. I had also given a brief description of how the OData protocol is and I had mentioned a quick scenario how the OData protocol can make our lives easier by allowing our API consumers to query/filter the API depending on the information required. I had also promised that in my next post I will prepare for you a full blown OData sample application which we will use to test the 'powers' of the OData protocol... and that's what we will be looking at today. I will walk you through in creating an OData Web API application and togather with some free tools we will experiment a bit with our API and try out some of the most cool features within the Protocol. As I have already mentioned this post follows up on my previous post about the new features of Web API 2.0 so if you haven't read it, please take some time to go through it quickly here.
Creating a Web API Project with OData support
First off I will show you step by step how to create a Web API project with OData support. We are going to use the same example mentioned in my previous blog on Web API 2.0 where we are going to create an API which provides information about a list of possible itineraries. We will create a sample list of flights (ex Malta to London), initialize our database with this sample list and then launch our Web API application which will be queried using the OData protocol end point. The OData protocol endpoint will support the basic CRUD operations.
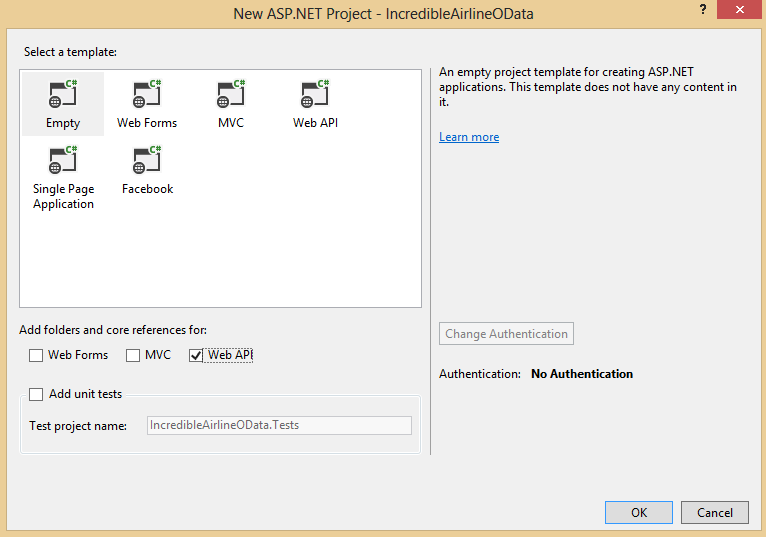
For starters we need to create a new Web API project. In the templates menu, choose 'Web Application' and choose an 'Empty Project'. Make sure you tick the 'Web API' check box in order for the project to be created with the applicatble files and folders for a Web API project structure as shown below:
After we create the project we must create the Entity model which we will be working on for this demonstration. In this case the model we are going to creates represents a single basic Flight object with a few properties to help us experiment with the OData endpoint functionalities as shown below:
public class Flight
{
    public int ID { get; set; }
    public string From { get; set; }
    public string To { get; set; }
    public string Code { get; set; }
    public int NumberOfStops { get; set; }
}
Now its time to build the project so that we will be able to use our 'Flight' as part of our Entity Framework Database Context generator. Next step is to create a Web API Controller which will support the OData protocol. In the same step we will instruct Visual Studio to initialize a Database Context for us using our 'Flight' model as its sole DbSet.
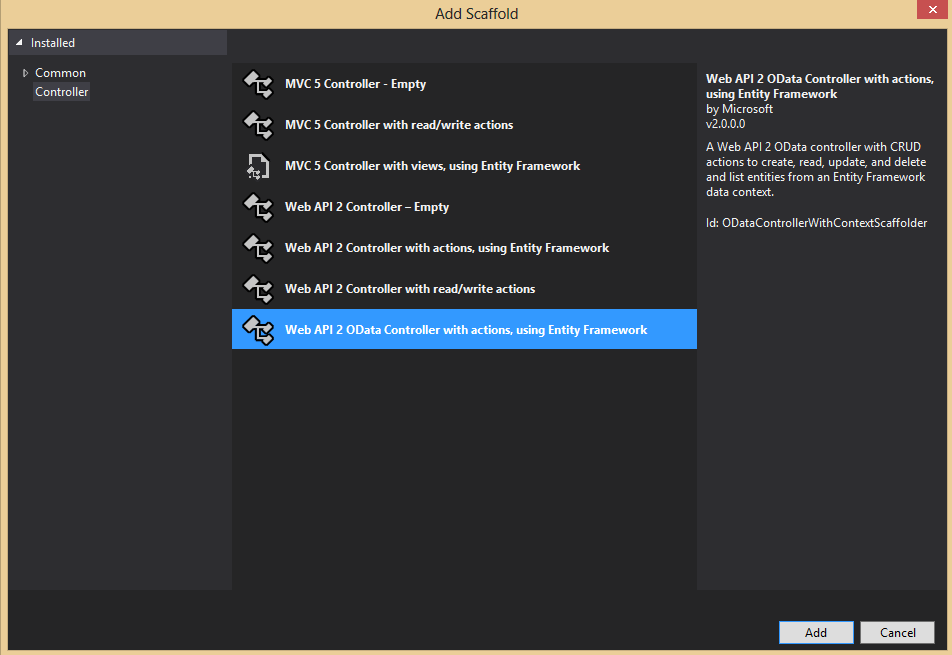
When creating a contoller we must make sure that we choose the scaffolding option of a Web API 2 controller with OData actions as shown in the image below:
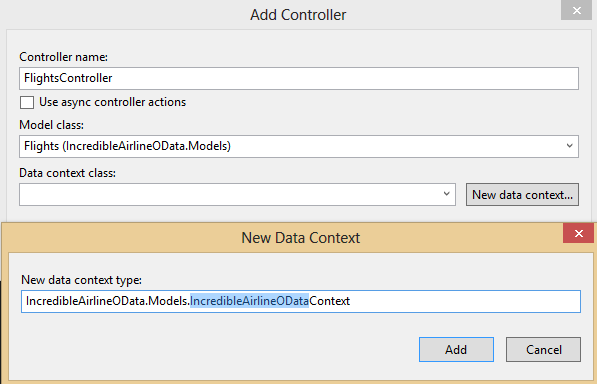
When adding the new controller scaffolding template, we should instruct Visual Studio to scaffold an controller based on our 'Flights' model and create a new Database Context for us as well.
Now that we have our Model, Controller and Database Context all set up we shuld turn our focus on the OData configurations over the Web API protocol. In the WebApiConfig file which is found in the App_Start folder we should change the Register code to the following code:
public static void Register(HttpConfiguration config)
{
    ODataConventionModelBuilder builder = new ODataConventionModelBuilder();
    builder.EntitySet<Flight>("Flights");
    config.Routes.MapODataRoute("ODataRoute", "odata", builder.GetEdmModel());
    config.EnableQuerySupport();
}
What this code does is very simple; basically first it creates a new instance of the ODataConventionModelBuilder class which will help us associate an Entity Model to the OData endpoint builder. The second line is to associate the EntitySet 'Flight' to our OData configuration and the third step creates an OData route through which we will be able to access our OData endpoint over the Web API configuration. The final line instructs the OData protocol that it should allow the Web API consumer to query the API through the new OData endpoint.
Thats it! We're done with the configuration, now all we need is to initialize our DataContext with some test data. In setting up some test data I would like to use the Database Migration tools introduced with the EF. Basically all you need to do is go to the 'Package Manager Console' and type in 'Enable-Migrations'. This command will basically set up Database migrations for your project. You should notice that after you execute this command, a new folder has been created in your project structure called 'Migrations'. In this folder you should find a file called 'Configuration'. In the file we are going to put some test data which I have prepared for this demonstration:
public Configuration()
{
    AutomaticMigrationsEnabled = false;
}

protected override void Seed(IncredibleAirlineOData.Models.IncredibleAirlineODataContext context)
{
    context.Flights.AddOrUpdate(new Flight[]{
        new Flight() { ID=1, From ="Malta", To="London", Code = "Flight001", NumberOfStops = 0},
        new Flight() { ID=2, From ="Malta", To="Paris", Code = "Flight002", NumberOfStops = 0},
        new Flight() { ID=3, From ="Malta", To="Spain", Code = "Flight003", NumberOfStops = 0},
        new Flight() { ID=4, From ="Malta", To="Australia", Code = "Flight004", NumberOfStops = 2},
        new Flight() { ID=5, From ="Malta", To="Australia", Code = "Flight005", NumberOfStops =1},
        new Flight() { ID=6, From ="Malta", To="Australia", Code = "Flight006", NumberOfStops = 3},
        new Flight() { ID=7, From ="Malta", To="Japan", Code = "Flight007", NumberOfStops = 2},
        new Flight() { ID=8, From ="Malta", To="Japan", Code = "Flight008", NumberOfStops = 1},
});
}
After you've copied this code to the Configurations file, you need to add the migration and initialize the database. You can do this by typing in the following commands in the Package Manager Console:
Add-Migration Initial
Update-Database
That's it, we have our Web API OData endpoint all set up. Now all we need to is to test the capabilities of our endpoint so that we can prove how powerful the OData protocol is and how it can maximize the potential of our APIs.
Analyzing the OData Endpoint
Now that we have the data in our project, lets move on to the fun stuff, testing our API using the OData endpoint that we've configured to retrieve spcific data. To assist us with our testing we will need a tool to help us send requests to the OData endpoint. For this test I am going to use the Advance Rest Client app which can be integrated to your Chrome browser. Another tool which is very powerful is 'Fiddler'. Both are equally sufficient for the purpose of our tests.
Lets start off with a very simple query. Lets say that as API consumers we're aware that the API when called returns a list of Flights, but we don't really know which properties of a Flight are available. There could be a situation where the API provider updated the underlying Data Model and we would want to check if there are any more properties which we could use. In order to check the 'meta' structure of the underlying Entity model, all you need to do as the consumer is to call the api with a 'metadata' operator at the end as shown below:
http://localhost:38999/odata/$metadata
The result of this call is the following:

The result states that this OData endpoint has one available EntityType which is called 'Flights'. It also shows us all the properties which are avaiilable to us related to the flight object. Note that we're using the 'odata' route name as configured previously when configuring the OData routing.
Using the $filter operator
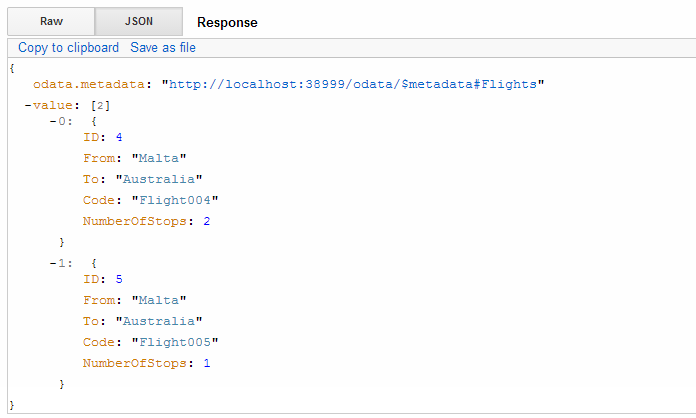
What if we want to get all the flights available that go to Australia? Instead of retrieving all the flights and then filtering the result data as we usually do with regular API's, using the OData endpoint over our Web API we can fiilter the requested data before it is actually retrieved. We can send the API a query of the data we actually want. The filter operator can be used as shown below:
http://localhost:38999/odata/Flights?$filter=To eq 'Australia'
In the query below we're specifying that from the 'Flights' Entity Model we want those flights where the 'To' property equals to 'Australia'. When executing that query we get the following results:

As you can see, from a list of 8 available Flights, the API returned only the ones where the 'To' property is 'Australia'.
Multiple Query Options
What if we want to be more specific with our query? What if we only want those flight going to Australia with a maximum of two stops? Using the Web API OData endpoint we can easily specify this query as:
http://localhost:38999/odata/Flights?$filter=To eq 'Australia' and NumberOfStops le 2
What we're saying here is that we want all the flights going to Australia and the number of stops on the way must be 'Less than or Equal' to 2. The resulting data set after making that call is the following:
Comparing this result set to the previous one, we can clearly see that the Flight option with 3 stops has been eliminated and only the two other flight options with 2 stops or less have been retrieved thus saving on resources and computational time both on the server side and the client side.
Order By Query option
Another query operator which might be very useful especially when retrieving lists of data or 'paged' information is the order by operator. Lets say you want to retrieve all the flights going to Japan ordered by the number of stops, this API call would get you the desired result set:
http://localhost:38999/odata/Flights?$filter=To eq 'Japan'&$orderby=NumberOfStops
Resulting in the following list of flights:

There are several query operators one can use which are supported by the Web API 2 OData protocol. The OData support for Web API is continously improving and more operators are supported with each Web API release. For a full list of Query options and Operators supported please follow this link.
Thats all from my end, I hope I managed to get your interest with the awesomness of the OData protocol and how powerful your API can become when provided with an OData endpoint. If you have any questions or queries regarding any OData functionality please do not hesitate to contact me. There is much more to OData than what we've done here today but it would take me a couple of blogs to go through all the OData capabilities.
Thanks for reading, until next time!
Shaun